Distributed Runtime Verification in Proximity-based Networks: A Tutorial on the Aggregate Programming Approach
Installation
The next sections contain the setup instructions based on the CMake build system for the various supported OSs. Jump to the section dedicated to your system of choice and ignore the others.
Linux
Pre-requisites:
- Xorg-dev package (X11)
- G++ 9 (or higher)
- CMake 3.18 (or higher)
- Asymptote (for building the plots)
- Doxygen (for building the documentation)
To install these packages in Ubuntu, type the following command:
sudo apt-get install xorg-dev g++ cmake asymptote doxygen
If you are using Wayland the following additional packages must be installed:
sudo apt-get install libwayland-dev libxkbcommon-dev
In Fedora, the xorg-dev package is not available. Instead, install the packages:
libX11-devel libXinerama-devel.x86_64 libXcursor-devel.x86_64 libXi-devel.x86_64 libXrandr-devel.x86_64 mesa-libGL-devel.x86_64
Additionally for Wayland on Fedora you’ll need the following packages:
wayland-devel libxkbcommon-devel
More detail on dependencies for distribution using Wayland are available at the following link.
MacOS
Pre-requisites:
- Xcode Command Line Tools
- CMake 3.18 (or higher)
- Asymptote (for building the plots)
- Doxygen (for building the documentation)
To install them, assuming you have the brew package manager, type the following commands:
xcode-select --install
brew install cmake asymptote doxygen
Windows
For Windows we currently suggest to install a Ubuntu virtual machine capable of display a graphical environment, such as Virtual Box.
On Windows the scripts used for building and launching the simulations do not provide all the functionalities and some user action is required (more details can be found in the notes).
Obtaining the source code
To retrieve the source code clone the repository with the following command:
git clone https://github.com/fcpp-experiments/past-ctl-monitoring.git
Build the demos
The repository contains the source code of simulations running past-CTL monitors to verify different properties.
Launching the bash script without additional input showcase the list of available simulations:
./make.sh
To build and run the drone recognition example execute the following command:
./make.sh drones_recognition
Running a simulation
When launching a simulation it is initially paused by pressing the P key you can pause/unpause the execution.
You can toggle the grid visualization with the G key and toggle the link visualization with the L key.
You can move the view around using the W,A,S,D keys and increase or decrease the zoom factor using the Q,E keys.
Simulation speed can be increased or decreased using the I,O keys and by pressing the H key or any unmapped key the help menu is presented pausing the simulation. To exit from the help menu press the P key again.
By clicking on a node in the simulation is possible to inspect the current state of the storage memory of a node.
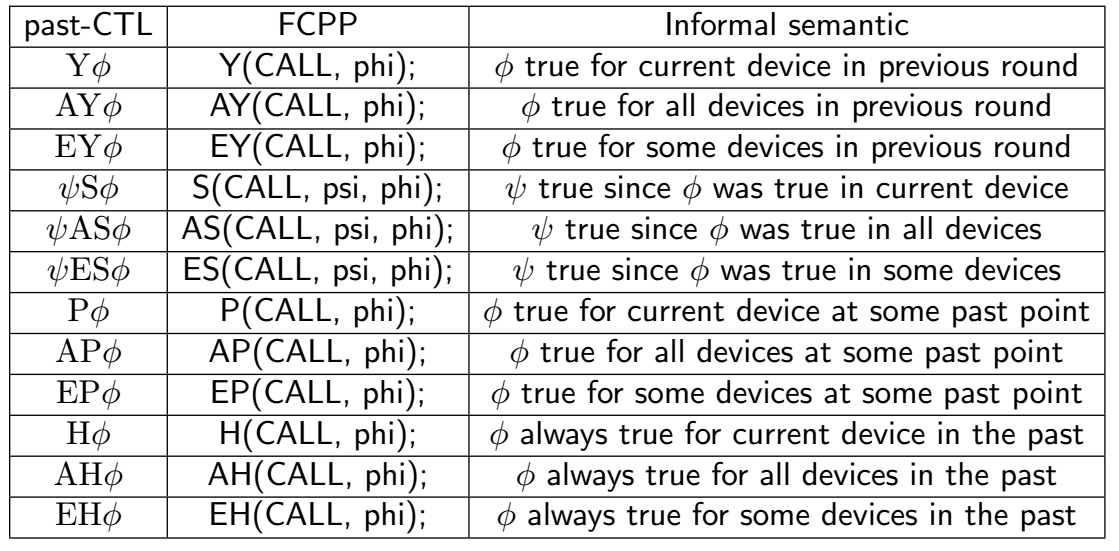
Reference pastCTL table
Notes
Windows
Due to the deprecation of certain functionalities on Windows 11, scripts have certain limitations.
Limitation:
- After closing the GUI of the simulation, the user need to forcefully terminate the process from the terminal
- Plot generation requires additional work-around steps and must be run manually
- Additional steps are required to ensure that Asymptote correctly works on Windows, explained in this link
Pre-requisites:
- MSYS2
- Asymptote (for building the plots)
- Texlive (Asymptote dependecy)
- Ghostscript (Asymptote dependency)
- Doxygen (for building the documentation)
At this point, run “MSYS2 MinGW x64” from the start menu; a terminal will appear. Run the following commands:
pacman -Syu
After updating packages, the terminal will close. Open it again, and then type:
pacman -Sy --noconfirm --needed base-devel mingw-w64-x86_64-toolchain mingw-w64-x86_64-cmake mingw-w64-x86_64-make git doxygen
The build system should now be available from the “MSYS2 MinGW x64” terminal.
For plot generation you need to install Asymptote, Texlive, Ghostscript. Additionally for manual plot generation you need to:
- copy plot.asy from the past-ctl-monitoring/plot folder into past-ctl-monitoring/output
- from the “MSYS2 MinGW x64” terminal invoke asymptote using MinGW notation
cd output
/c/Program\ Files/Asymptote/asy smart_home.txt -textpath="C:\Program Files\Path" -f pdf
Where the textpath option must contain the path to the folder containing the pdflatex executable installed by texlive.
To build and run the examples on Windows an additional argument is needed execute the following command:
./make.sh windows drones_recognition